Google Forms & AutoCrat - A match merged in heaven!Using Google Forms and AutoCrat, you can create dynamic forms that will produce a Google Doc or PDF file with data submitted from the form.
Creating a Google Form will automatically create a Google Sheet to store data from the form.
When you install AutoCrat on the Google Sheet, you open a new world of opportunities to merge data from the Sheet into Google Docs or other Sheets.
Step 1 - Create New Folder in Google DriveIt is important that you keep all of your files organized properly because this process will require several files. The first step you will need to do is create a new folder in your Google Drive to house each Google Form and Mail Merge project.
Step 2 - Create Template for Mail MergeYou will need to create a new Google Doc inside the new folder that you created; this will be the template for your merge. During this step, you will need to make a list of the data you intend to request from the Google Form.
The way the template links to your form data is by bracketing words <<thusly>>. If you need to collect three items from your form, you will place each item within the brackets in the spot where you want the data to exist.
Example Variables:
<<FirstName>>
<<LastName>>
<<Email>>
Example Template:
<<FirstName>> <<LastName>>'s email address is <<Email>>.
The template would output the following for the user:
John Smith's email address is [email protected].
Step 3 - Create Google FormYou will need to create a Google Form to collect data to send out using your Mail Merge. This is the meat and potatoes of your project. The following video is an excellent tutorial that shows you how to make a Reading Log for your students. The same instructions can help you create the form for your Mail Merge.
If you will only need to get a person's name for this project, be sure that you also ask for their email address so you can send them an email through the Mail Merge.
***This video uses the NEW Google Forms.*** Many of the videos around YouTube use the older Google Forms; the NEW Google Forms has only been around for a short time. If your Google Forms does not look like this video, you will probably be prompted to "try" the new Forms, and I would suggest you go for it! Eventually the "new" Forms will be the standard!
Step 4 - AutoCrat MagicBelow are a couple of videos from the makers of AutoCrat that give a brief overview of the program. I would recommend that you watch them to familiarize yourself with the features. These videos are more informative than educational. I would recommend watching the third video by Amy Mayer for an instructional video. What is AutoCrat?
Merging Data with AutoCrat
Step 4 (cont.) Below is a video with the updated version of AutoCrat. This version is very user friendly!
Firing Up AutoCratAfter your Google Form is created, you will open up the Sheet that contains the responses for that form. (Hint: it should be stored in the same location as your Google Form.)
Go to Add-Ons -> Get add-ons
Scroll through the list and find AutoCrat
Choose AutoCrat
Click Install
You will have to give AutoCrat permissions to edit your spreadsheet; do so.
Once AutoCrat is authorized, you can access it by choosing:
Add-Ons -> AutoCrat -> LAUNCH
Click the icon seen below.
Go to Add-Ons -> Get add-ons
Scroll through the list and find AutoCrat
Choose AutoCrat
Click Install
You will have to give AutoCrat permissions to edit your spreadsheet; do so.
Once AutoCrat is authorized, you can access it by choosing:
Add-Ons -> AutoCrat -> LAUNCH
Click the icon seen below.

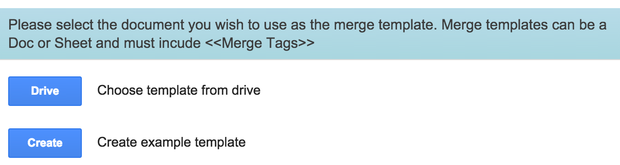
After you start a new merge job, you will be given two options.
Since you have already created your template, you will choose "DRIVE" and find the template in your Google Drive.
Since you have already created your template, you will choose "DRIVE" and find the template in your Google Drive.
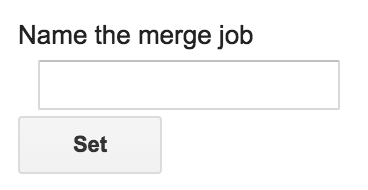
Give your Merge a name.
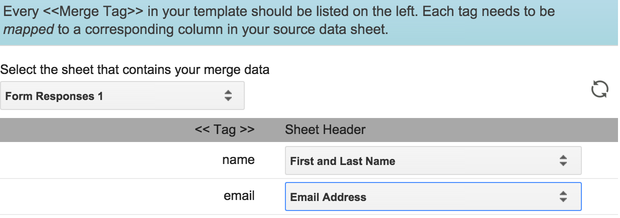
Next, you will assign the variables from your template (using the <<tags>>) to the columns available in your Responses sheet. and click NEXT.
Output Options for Your Data
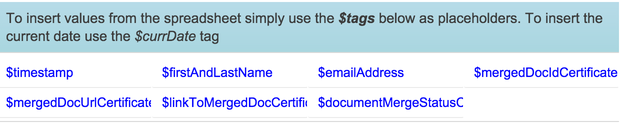
After assigning variables from your template to your sheet, you will proceed to the third, and last, setup screen for AutoCrat. This is where you will tell AutoCrat what to do with your data.
Tags will be created to coincide with the fields on the form and spreadsheet. You can utilize these variables by using $tags, as seen below.
Next, you will choose how you want to format file names. Because you can create and store individual files each time the form is submitted, I would suggest using$Name-$timestamp to produce:
RonnieRoss01-19-16.pdf
RonnieRoss01-19-16.pdf

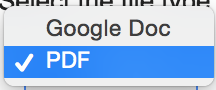
You can choose to create individual Google Doc files or PDFs each time the form submitted.
If you wish to email the user, check the "Email and/or share merged documents" option. Be sure to put the $emailAddress tag from your sheet in the email address field! You can customize the message to say "Hello $Name" if you have a tag called $Name or something similar.
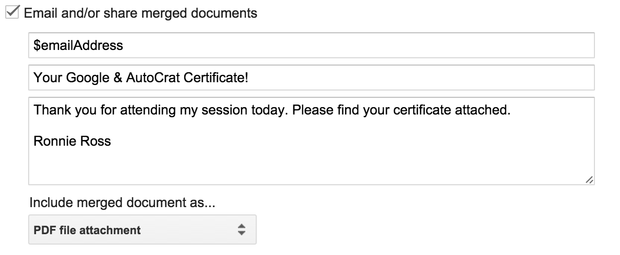
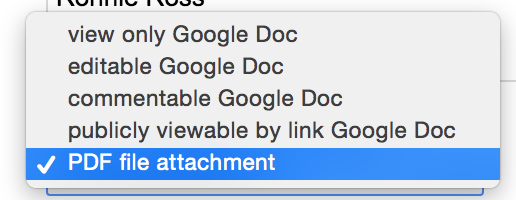
As if you didn't already have enough options, AutoCrat will now let you choose the type of document you want to share with the user. PDF is the best option if you are sending a file to be printed or need it to be permanently fixed. The editable Google Doc options are great for using with student assignments; however, Google Classroom has revolutionized this process, which sort of makes this process obsolete for that purpose.
You have the option to SAVE all of the files that are created. I ALWAYS do this, especially if it is for a conference or classroom project. Documents created within Google Drive do NOT take away from your allotted storage on Google Drive; why not save all of the files as long as you have them neatly organized? ;)
Click ADVANCED SETTINGS and choose the destination folder where you would like to store the folders. Perhaps you are creating files that you want to share with someone else. You could easily share that folder from within Google Drive to anyone!
Click ADVANCED SETTINGS and choose the destination folder where you would like to store the folders. Perhaps you are creating files that you want to share with someone else. You could easily share that folder from within Google Drive to anyone!

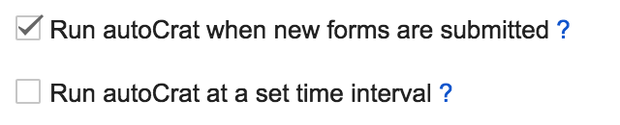
THE MOST IMPORTANT STEP!If you are have a form that you want to run every time the form is submitted, you must check this box; otherwise, you will end up with a spreadsheet full of data, and you will have to manually run AutoCrat in order for users to receive their documents.
YOU ARE FINISHED!! BRAVO!!
Retrieved from https://www.smore.com/gh8z7-google-forms-autocrat
 RSS Feed
